I have a piece of a field that has been fenced off and allowed
to
grow wild, right next to the canal. It is a
haven
for wildlife and frogs love to settle in the long damp grass.
You would think that frogs like to hide in a pond but nope they
love the grass, under damp rocks at the side of water and even
garden dung heaps.
Nature is amazing, as soon as the frogs move about, their
activities are witnessed from the air and down comes the heron.
I have been trying to get
a close up picture of this heron for a long time but every time I get near
to him, he is off on the wing. He loves to stand on the fallen tree in the swamp
area with his beady eyes planted for movement in the grass. It's
the same guy that executes dawn raids on my garden pond hoping to
catch my fish or perhaps some unlucky frog amongst the rocks at
the side of the pond which is hunting the midges.
If you ever go camping in the Scottish Highlands, especially
near water, never step out of a tent during the night or early
morning without any clothes on - not only will you get arrested
but the midges will be drawn in the dark to your naked skin in
their thousands and before you can get back into the tent you
will suffer bites that last for days and cover your body in red
itchy lumps. Then try eating your porridge with your eyes half
shut and your lips double the size. If you are coming to
Scotland this year, don't worry we have great 'midge sprays' to
deter the little blighters.
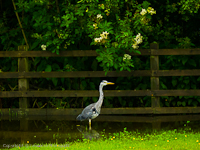
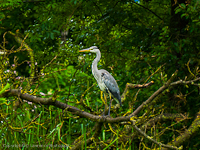
Yesterday, I managed to get
near the heron without disturbing him and using my Panasonic GF1 Micro 4/3rds camera with the external
view finder fitted and Lumix
100-300mm f4/f5.6 OIS zoom lens 'hand held', I managed to get this shot
before he flew off. The small image is the actual shot taken at
about 90 feet away and the larger image is cropped in for
effect.
MORE
The combo has
it's
image quality vs distance limitations but the image is not half
bad for a lens that costs around £385.00 vat inclusive in the UK
(including the Panasonic £50 cash back). The lens 'field
of view' with the digital sensor 2x crop and the post processing
cropping in Lightroom 4.1 is probably about 800mm.
You can purchase the lens in the UK -
"Panasonic 100-300mm f4.0-5.6 Lumix G Vario Lens offers a long
zoom range of 100-300mm (35mm camera equivalent: 200-600mm)
while achieving minimum distortion and chromatic aberration by
implementing advanced lens system including an ED (Extra Low
Dispersion) lens. It incorporates Panasonic's MEGA O.I.S.
(Optical Image Stabilizer), which makes it easy to shoot super
clear shots even in telephoto shooting or in low-lit situations
without using a tripod by suppressing the blur caused by a hand
shake. 7 aperture blades consists a circular aperture diaphragm
and produces an attractive smoothness in out-of-focus areas even
shooting at large aperture settings. This lens system uses
multi-coated lens elements that reduce ghosts and flare to an
absolute minimum, helping deliver a high optical performance"
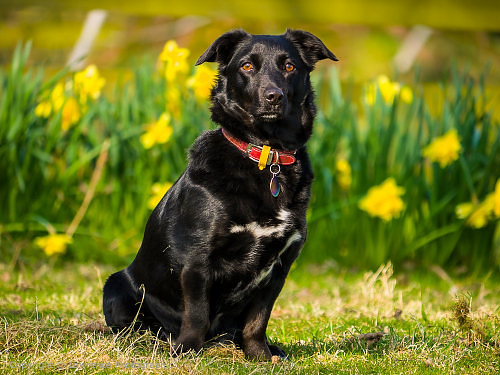
Tasha has short legs, a long sausage body, a cute face and
being a
small dog with terrier instincts she has great fun chases rabbits but
never catches them. She never stops barking at the door when she is
being let out for a walk and despite those funny curved small legs she
can run like a whippet and perhaps there is part of one in her?
The image
of Tasha was captured recently with a Panasonic GF1 Micro 4/3rds camera
and Lumix 100-300mm OIS zoom lens 'hand held'. The background is a
patch of daffodils with a wooden fence behind them and white slanted
plastic posts some 50 feet behind the fence in the far distance. It was
post processed in Adobe Lightroom 4 software with minor adjustments to
saturation, contrast, brightness and sharpness.
I was
checking out one of the 'gear' forums today and it is no surprise that
many photographers have stated that they will forever hold onto their
Panasonic GF1 camera even if they upgrade to another camera. They regard
it as a 'classic' and I have to agree.
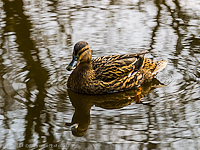
A couple of recent images taken with my Panasonic GF1 Micro 4/3rds camera with clip
on viewfinder and Lumix 100-300mm OIS zoom lens.
The shots were taken 'hand held' at my home and at the nearby canal. The
'RAW' files were converted in Adobe Lightroom 4 software with minimum
post processing. The female duck is quite plain but shot against the
ripples of the murky canal water, she seemed more interesting.
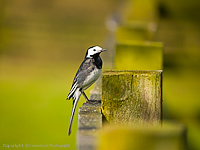
The pied wagtail (I think it is a female) is quite a flighty
bird, always hopping about, darting here and there but she remained
stationery for a second during this shot. If you check out the post next
to the bird in the picture, you can see insects on the right side.
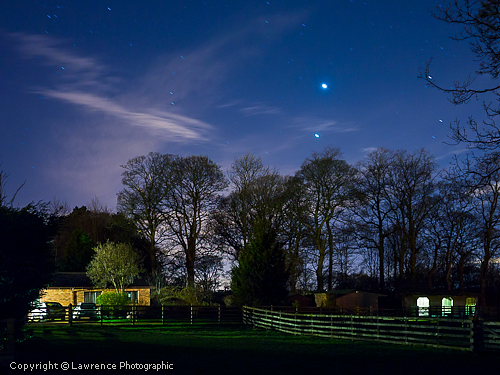
I had
never used my Panasonic GF1 Micro 4/3rds digital camera and
Lumix 20mm f1.7 lens for a long exposure shot at night.
Last night, I decided to try out the combo at my home, especially
with Jupiter and Venus passing overhead............I was sure
the two bright stars above my house were those planets as I had
never seen them before.
It was cold and the sky was pitch black but very
clear when I set up my
Manfrotto 055MF3 tripod in the field. The tripod was fitted with
a Manfrotto 468MGRC2 ball head. The GF1 camera was set up for 10sec
timer, multi area exposure metering, small spot central area
autofocus, aperture priority, ISO:100, aperture
at f4 and the shutter compensated for a 60 second shot. However,
the main problem was trying to obtain an accurate focus and the
camera just hunted when I tried to lock onto a star/planet. When I looked at the LCD screen all I could see was pitch
blackness with light showing at the house on the left and light
at the stables on the right.
I wanted a well lit image and I figured that the house area was
a reasonable balance, so I just tipped the tripod over to the
front and and to the left side, locked onto the house, holding
the shutter at half press, I re-aligned the tripod by tipping it
back to it's original place and pressed the shutter home. The
timer's 10 seconds steadied the rig, the shutter fired and the
exposure lasted 60 seconds with a further 60 seconds to save the
data to the memory card.
The 'RAW' image was originally processed in Adobe Lightroom 3
and then I later upgraded the software to Lightroom 4 and
upgraded the image when the software requested it. Incredibly I
could see the improvement to the image as LR4 made the update -
it became much clearer overall. The marks on the fencing are
natural and caused by weathering, not the processing. This image
has been adjusted for slight brightness, saturation, contrast
and sharpening. The very slight distortion in the image was
corrected to bring the stables and the fencing on the right into
the vertical position. I could not see the distortion on the
left edge of the image due to the dark trees.
Unfortunately I could not
get planet Earth to stop so the sky had shifted slightly during
the exposure and elongated Venus and Jupiter as well as all the
stars. The Lumix 20mm does suffer very slightly from a 'coma'
effect
(depends on the angle of light)even without my UV filter fitted,
so the largest planet did display it as a small light shadow
above and I cleaned it as best as I could with the clone healer
in LR4. I knew this was a wrinkle before I started but I wanted
to see how the GF1 and the 20mm lens handled noise with a long
exposure at ISO:100. The noise was very well controlled but I
did very slightly tweak it.
Normally I take these kind of shots with my DSLR but the GF1 and
the Lumix 20mm lens combo was not that bad. This image is good
for at least a 23" x 17" print - wow, what a moment in
time!
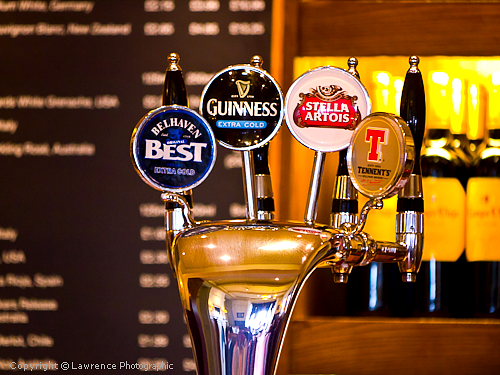
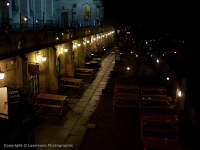
This was taken in an Edinburgh pub and is an image of the bar counter -
the camera used was a Panasonic GF1 with a Lumix 100-300mm OIS zoom lens
and the (small size) centre area focus was locked on the Belhaven
Best logo and the scene re-aligned.
Shot Data - 300mm (600mm field of view)
hand held whilst sitting on a chair, camera held out in front of me and
LCD screen used to frame the scene - RAW file, ISO:800, aperture f5.6
and shutter at 1/10sec (one tenth of a second) processed in Adobe
Lightroom (minimal basic adjustments).
My Panasonic GF1 Micro 4/3rds digital compact system camera with
it's Lumix 20mm f1.7 ASPH lens is a neat combo for carrying
around, especially if I leave the clip on external viewfinder
off the camera and pop it into it's small carrying case in my
pocket.
I often just take the combo in my Lowepro Apex 60AW
bag which I can clip to my belt or use as a shoulder bag.
Digital cameras don't like damp weather and the Lowepro Apex
60AW has a weatherproof cover that can be pulled out and slipped
completely over the bag. I once made the mistake of not covering
the bag in the rain and the dampness soaked through to the
camera, misting it all up. Fortunately the camera was not
damaged but I learned my lesson.
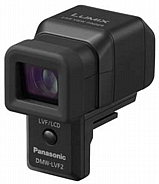
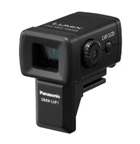
The GF1+20mm lens has excellent resolution and the 2012
equivalent of my (2009) combo and capable of delivering
even higher image quality with a 'far superior resolution' clip
on external LVF2 viewfinder is the Panasonic GX1 Micro 4/3rds
compact system camera.
Images of the new Panasonic Lumix
GX1 Camera + Viewfinder (click image for specification) -
The following image was captured with the GF1 + Lumix 20mm f1.7
ASPH lens (Hoya HMC 46mm UV filter fitted) and the
'distance' resolution is not half bad for a small digital sensor
camera which was 'hand held'. I was up on Blackford Hill in
Edinburgh with Brad (my dog) and the scene is the east
coast of Scotland with Cockenzie Power Station in the far
distance with Berwick Law (the high hill) further back to
the left.
In the foreground on the right is the Royal Observatory which
had just been renovated and you can see the new copper sections.
If you open up the image to the 1,200 pixel size and look
carefully, you can see a plane in the top left part of the
image.
When using the combo 'hand held' to shoot landscapes, I find
that to achieve the optimum resolution, I am seeking the lowest
ISO rating and the highest shutter speed possible. I know that
the camera can capture images at 1/10sec 'hand held' but for
distant landscapes I want a shutter speed of around 1/400sec
minimum and even higher if possible.
Image Stats - 40mm field of view,
ISO:100 aperture f4 shutter 1/800sec
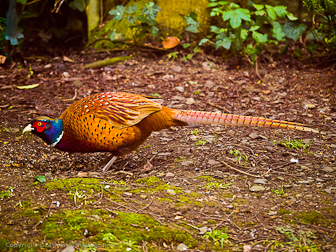
When you live in the countryside all manner of creatures appear at your
door and these guys are no exception, especially in the winter time.
The pheasant appears just after the hunting season
starts and comes to
my back door every morning for crushed peanuts and biscuits. He
has been coming to visit at Hermiston for the last three years. Some
times we have hen pheasants as well but for some reason there has been
no sign of them this year.
The pheasant actually stares at
Brad(my dog) through the
patio window and knocks on the glass with his beak to attract my
attention. He watches through the window whilst I blend the peanuts and
then retires to the high garden wall until the food is put out near the
bushes. This
100mm '200mm field of view' shot
of him was taken
with my Panasonic GF1 Micro 4/3rds camera (external viewfinder
fitted) and Lumix 100-300mm OIS zoom
lens 'hand held'
through thick and dirty glass - the windows are never cleaned during the
winter months.
The 'RAW' file settings are ISO:800, Aperture
f4, shutter 1/320sec and developed using Adobe Lightroom 3 software
with adjustments for contrast, brightness, saturation, slight noise
reduction and sharpness.
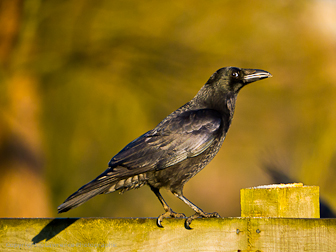
The crow has a mate and they both visit regularly, in fact they are
never away from the place and raise their
young
at Hermiston every year. They invariably sit up in the sycamore trees
and stand guard ready to chase or harass the buzzard when it lands on a
branch. There have been some grand fights in the sky and on the ground.
Once I had to pull the buzzard of this guy who was upside down on the
grass getting a right old pasting - they were so busy fighting they
never saw me until I intervened.
Every time we come home in the car or go out for a walk in the grounds,
the crows appear and start squawking for food. I usually put out
broken biscuits on some of the fence posts and they come down to feed.
It is great fun in the summer when they are feeding the young, who fall
about a lot.
This 300mm '600mm field of view' shot was taken with my Panasonic GF1 Micro 4/3rds camera
(external view finder fitted) and Lumix
100-300mm OIS zoom lens 'hand held' outside in the open and the 'RAW'
file settings are ISO:400, Aperture f5.6, shutter 1/800sec and developed
using Adobe Lightroom 3 software with adjustments for contrast,
brightness, saturation and sharpness. You can see from the photo that
his eye is always on me, always alert, especially when I have the
camera.
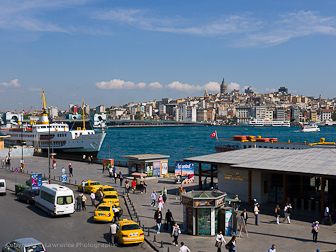
The
Panasonic Lumix 14-45mm f3.5/f5.6 OIS zoom lens
is a lens that I like for general 'walk around' photography.
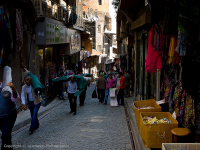
I
also used it with my Panasonic GF1 Micro 4/3rds digital camera during my
last holiday in Turkey (Istanbul). The image below (click to
enlarge) is nothing special in composition but it does provide a
reasonable idea of the image quality in a depth of field extending to
infinity from a 44mm 'field of view' at an aperture of f8.
I still use it with my Panasonic GF1 which delivers a 28mm-90mm 'field of view' and produces excellent images. The video below
contains 'full sized' jpegs captured using the combo 'hand held' in
Edinburgh, Scotland and Istanbul, Turkey. Converted from 'RAW' files in Adobe Lightroom 3 and then finally
rendered to Mpeg-4 format using Cyberlink Power Director
Ultra 10 Software. Some of the sharpness has been lost in the video
rendering which is more down to the YouTube upload than the actual
Cyberlink Software.
For the
highest resolution and best effect, run the video full screen at 1080p -
also a
The
Panasonic Lumix 100-300mm f4/f5.6 OIS zoom lens
is one of my all time favourites and I cannot wait to team it up with the new
Panasonic GH3 Micro 4/3rds digital camera when it
appears (hopefully) in February?
I currently use it with my Panasonic GF1 which delivers an incredible
200-600mm 'field of view' and produces excellent images. The video below
contains 'full sized' jpegs captured using the combo 'hand held' and
converted from 'RAW' files in Adobe Lightroom 3 and then finally
rendered to Mpeg-4 format using Cyberlink Power Director
Ultra 10 Software. Some of the sharpness has been lost in the video
rendering which is more down to the YouTube upload than the actual
Cyberlink Software.
Virtually all the zoo animal images were either taken through thick
glass, fine mesh or metal frames.
For the
highest resolution and best effect, run the video full screen at 1080p -
also a
larger frame version.
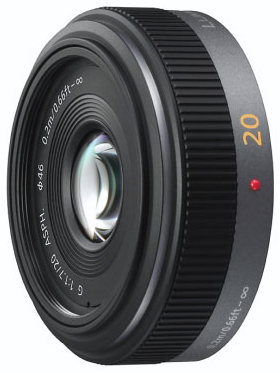
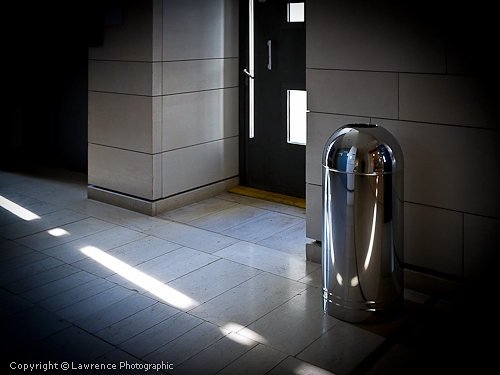
The Panasonic 20mm f1.7
ASPH Lens is one of my favourite lenses and I use it with my Panasonic GF1
Micro 4/3rds digital camera.
The combo is great with the clip on external view finder
removed, especially indoors where I like to use the LCD screen. My GF1
is a bit long in the tooth by digital standards but the image quality
with the 20mm (40mm field of view) is superb.
The 20mm is most excellent at aperture f1.7 'wide open' and I can 'hand
hold' the combo at 1/10sec without any problems. In low light conditions
I can work at ISO:800 f1.7 (no flash) and
even with noise reduction in post processing, the image quality will
hold up. At ISO:1600 in brighter conditions with less shadow, the
20mm lens on the GF1 still delivers the goods.
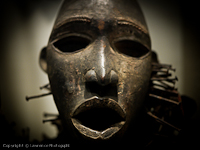
I have re-visited old images taken during a visit to the National
Museum of Scotland in Edinburgh and compiling a Mpeg-4 video of some of
them. I came across this image that I really like - plain and simple,
almost devoid of colour - it was shot at ISO:100, aperture f2.0, shutter
1/60sec and post processed in Adobe Lightroom 3 software for saturation,
brightness, contrast, sharpening and applied vignetting.
The following video clip contains more GF1 + 20mm lens images taken during my
visit to the
National
Museum of Scotland. For the highest resolution and best effect, run the
video full screen at 1080p.
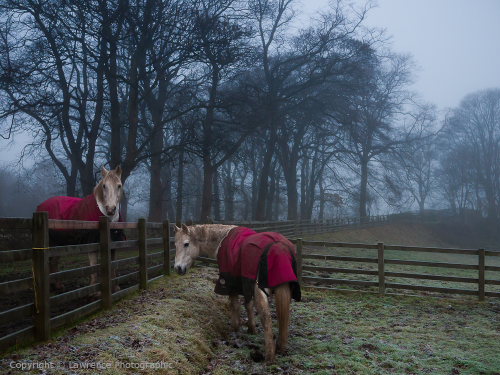
Heavy gales, some travelling at 100 mph plus have battered central
Scotland and over here on the east coast at Edinburgh we have really
suffered the high winds and yet more rain!
Three large trees have come down and smashed into the fields - in the
picture below (click to open) the larger tree immediately behind 'Lady'
the horse on the left has demolished the dry stain dyke and my fence.
Looks like I will be spending most of my time this month cutting the
trees up for removal.
This is an old image, captured with my GF1 + Lumix 20mm f1.7 lens, when
I first purchased the combo back in the winter of 2009. You can read
more about the combo in my
GF1 Diary (downsizing article).
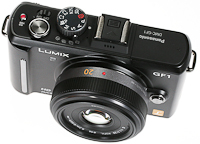
Panasonic GF1 Micro 4/3rds Camera + Lumix 20mm f1.7 Lens
I have finished the upgrading of my Croatia images using Adobe Lightroom
and creating a new sub web.
I have added some of them in larger format (1,000 pixel) to my Colour
Images Section on my website.
Adobe Lightroom sure makes the work easy but I will be glad when all the
FrontPage stuff is converted to the Lightroom format. I would really
like to display everything in 1,000 pixel format but space is at a
premium for the moment. Once I get into video presentations later this
year - I may up the image sizes?
What is the ideal camera and lens for 'street photography' and are there
any limits?
Ask a Leicaphile and the Leica answer will be a 35mm 'full frame'
digital sensor or 35mm 'film' camera with a 50mm lens - the same combo
that Henri Carter-Bresson used for his street photography. However, in
some cases a 35mm lens is preferred for wider shots and to enable the
photographer to get in amongst the action.
In the TV documentary of America in Pictures, the photographer Rankin in
Times Square used a much larger Leica S2 'medium format' camera to shoot
the street scene - hardly a small rig. So what is the ideal combo for
'street photography' and what, if any, are the lens focal limits?
Street photography can be difficult at times, especially in the UK and
in these 'modern times' a photographer has to be 'more aware' of the
pitfalls when taking pictures of people. It can prove difficult to
know what camera to take along, a small inconspicuous camera and lens
can be frowned upon if it is brought up quickly to the eye and then put
back down at your side - it can draw suspicious looks. On the other hand
a picture taken from a distance away can be just as suspicious and
problematic if a member of the public spots you and takes exception. I often watch the
videos where the photographer is right in there, amongst the people,
clicking away, smiling, talking, sending out the social signals and I
wonder how they get away with it? To make the video the public are aware
that the photographer is being filmed and behave in a reasonable manner
but I often wonder just how many would have turned hostile if
that video cameraman had not been there?
Fortunately, I have never had any dramatic moments with the public as I
tend to take pictures at events where there are many photographers
milling about or on holiday, when I am just a tourist with a camera. I
do prefer a longer focal length and this is not because I want to
disappear into the background but rather that I can cut right through a
crowd of people to isolate an individual. A lens with a fixed focal
length can prove difficult as it invariable does not offer the 'optimum'
flexibility so I do prefer a zoom lens. The size of the combo does not
seem to pose a problem as I have used my Canon 5D DSLR + Canon 24-105L
zoom lens along with my smaller Panasonic GF1 + Lumix 20mm prime,
14-45mm zoom and even with my Lumix 100-300mm OIS zoom lens.
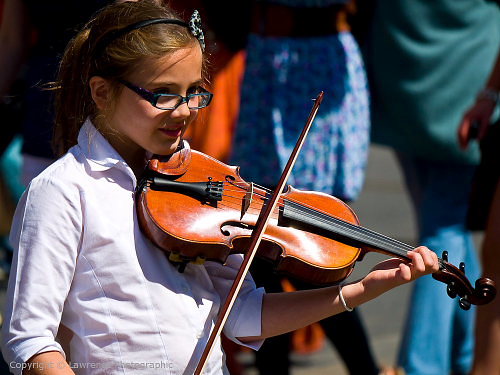
Back in July, I tried out my Lumix 100-300mm OIS zoom lens fitted to my
Panasonic GF1 camera in the streets of Edinburgh and it worked out very
well for isolating individual subjects from the crowd. The combo was not
inconspicuous but drew very little attention as there were other
photographers taking pictures of the 'street performers'. The picture
above was captured using this combo and isolated the performer from the
large crowds around her. It was taken 'hand held' at ISO:200, shutter
1/2500sec, aperture f4.8 and at 188mm (376mm FOV). It was a 'RAW' file
post processed in Adobe Lightroom with the minimum corrections of
brightness, saturation, contrast and sharpness - no cropping, no noise
reduction. You can click on the picture to open it up to 1,000 pixels
and click again to return here.
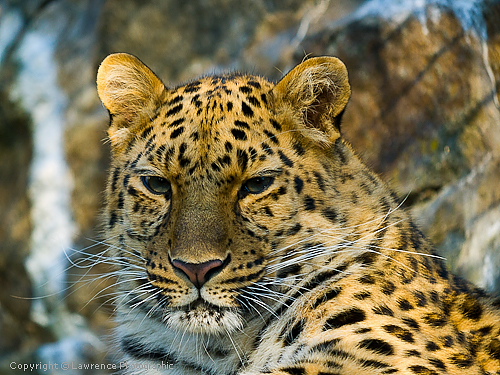
I visited the local zoo in Edinburgh the other day for a casual walk
around to see the animals and a spot of lunch. I had my Panasonic GF1
and Lumix 100-300mm OIS zoom lens with me, a great rig for carrying
around cupped in my right hand all day, no sweat and no neck pain.
This picture was taken 'hand held' through thick glass at an acute
angle. The wire shadows and shimmering are in the background caused by
the sun entering through the top of the cage, the Jaguar was sitting
high up at the right side - you can see a wider shot in my zoo gallery.
The details of this GF1 image are on the larger plate version - click
the image to open it up and then click again to return to here!
What is the problem with the Lumix 100-300mm OIS Zoom lens - well
nothing really, it does the job and coupled with the GF1 it produces
excellent images right through the focal range. However on very bright
days, the GF1 is a nightmare to use with it's LCD screen and with the
external electronic viewfinder it is very hard to compose a shot on an
animal or bird that is moving. I get by but it's a pity because it robs
you of the (total) pleasure that the lens is capable of delivering. I
suspect that a younger person may not have the same problems?
For more information and image samples - visit my articles
GF1 Diary -
Lumix 100-300mm and for a large
number of samples visit (updated this date) galleries 3-6 of my
Zoo Gallery. The Lumix 100-300mm
images start at the seagull image on index 3 - even seagulls reside at
the zoo. You will also be able to compare images with my Canon 70-200mm
f2.8 IS L and Canon 300mm f2.8 IS L Lenses in my Zoo Gallery.
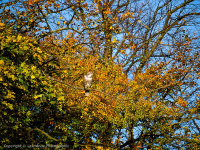
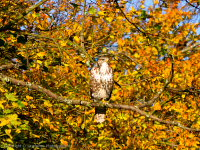
I am still trying to get a proper shot of the buzzard at my home.
I
was
working in the field today and it landed on a tree in the brilliant
sunshine, so I grabbed my GF1 with its external viewfinder fitted and the Lumix 100-300mm lens from the house. I started to walk across the
field towards the tree but using the viewfinder, I could not
pick out the bird against the autumn leaves. I wasted a great deal of time
trying to 'frame' the bird - I could see it with my naked eye but
through the viewfinder was a different matter. In fairness to Panasonic,
the bird was pretty well camouflaged against the leaves.
It was difficult to get some shots in, considering that I was slowly
walking towards the bird in an open field, in brilliant sunshine and
'hand holding' the camera. It was watching me from the tree and then
flew off, just as I was getting within range.
When I use the lens at 300mm (600mm field of view) I always try to get
the primary subject as large as possible in the viewfinder, at least
1/3rd of the frame height.
On
a very bright day, a fairly static subject would let me get the ISO
rating down to 200 and sometimes even 100 but as you can see from the
main shot that the bird was nowhere near that size in the frame before
it flew off. I had started at ISO:400 to get the shutter speed up at
1/1250sec as the
subject was distant and small. My intention was to reduce the ISO
rating and shutter speed as I got nearer and the bird became larger in
the viewfinder but I never got the chance. The Micro 4/3rds sensor is
forgiving but it has it's limitations, the smaller the subject is in the
viewfinder the harder it is to hold the camera and lens steady over it
and so a much higher shutter speed is required - even if the subject is
static.
I was using the GF1 with the autofocus centre area (spot) reduced in
size to fix totally on the bird's body. The exposure metering was set
for multiple weighed.
It turned out an interesting exercise - to fine check the limitations of
the lens at 300mm in bright sunshine. I used Adobe Lightroom to process
the 'RAW' image files.
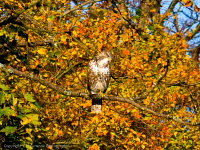
The single image is not cropped and serves to show the size of the bird
as I saw it in the viewfinder. The other two images are 'cropped'
examples, one of the 1st image and the other was a 2nd shot cropped. The
'cropped' versions are 1,000 pixels and reduced in quality by 40% to
save web space. The shot details are on the large examples under each
image. I did not apply any noise reduction
but I did sharpen them.
The 1st image (click to enlarge) may at first appear out of focus but
this is due to small areas of the image on the same plane which are in
focus due to the thin 'depth of field' of the lens at f5.6 at 300mm (600
field of view) or it may just be my eyes?
The cropped images show the bird at the ideal size it should have been
'in the viewfinder' when the shots were taken. I know the image quality
of this lens is exceptional at 300mm and even more so at an aperture of
f8 but the subject has to be relatively large in the viewfinder when the
shot is taken and the shutter speed has to be correctly set for the
conditions.
The 'cropped' images when converted from 'RAW' to a tiff file format are
good (with more than reasonable image quality) for a print size of
11.75" x 8.83".
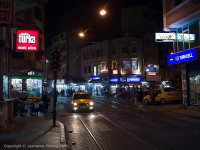
I like my Panasonic GF1 Micro 4/3rds digital
camera and Lumix
20mm f1.7 Lens for street photography.
The combo is very discreet, compact and
lightweight and unlike digital compact cameras with their fixed lenses
the GF1 has a much larger 4/3rds
sensor.
The 20mm lens is great for low light, even in the darkness under
street
lights and it seems to cope well, even
when used at ISO:800 and
sometimes, depending on the light, I get good results at ISO:1600.
All the
images were captured 'hand held' and the
'combo' will
successfully operate even down at 1/10sec shutter..........obviously at that speed, any moving subjects will blur.
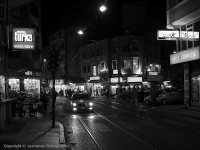
Black
and White photography seems to be very
popular
at the moment, just like the return of white cars.
I like colour just as
much, so these days I
tend to convert my colour images to monochrome and place both types on
my website.
I use Adobe Lightroom for all my post processing and it does quite a
good job of colour to monochrome conversion.
The combo is also excellent at aperture
f1.7 and more than capable of creating
a shallow depth of field when required. I also use it on the odd
occasion in 'hyperfocal mode'.
The GF1 is hard to come by these days but new ones can still be found
and obviously second hand ones can be sourced on the Internet.
The other camera from Panasonic to consider is the G3 which is similar
to the GF1 but has a viewfinder built into the body.
From the Panasonic Web
Site - The LUMIX G VARIO 100-300mm / F4.0-5.6 / MEGA O.I.S. offers a
long zoom
range
of 100-300mm (35mm camera equivalent: 200-600mm) while achieving minimum
distortion and chromatic aberration by implementing advanced lens system
including an ED (Extra Low Dispersion) lens.
The
LUMIX G VARIO 100-300mm
/ F4.0-5.6 / MEGA O.I.S. incorporates Panasonic's MEGA O.I.S. (Optical
Image Stabilizer), which makes it easy to shoot super clear shots even
in telephoto shooting or in low-lit situations without using a tripod by
suppressing the blur caused by a hand shake.
When mounted on LUMIX G
Micro System cameras, the LUMIX G VARIO 100-300mm / F4.0-5.6 / MEGA
O.I.S. allows use of the advanced contrast AF system, which includes a
Face Recognition function, for more convenient, more enjoyable shooting.
This has to be one of the most 'fun lenses' I own and I
thoroughly enjoy using it. It works fairly well with the GF1 plus the
'clip on' Panasonic external viewfinder and I can achieve some nice
images. I find myself using this lens a lot..............around the area
at my home and when I can, at the zoo and nature reserves. Although this
year has not been that great for photography as I have spent a great
deal of time stuck at home nursing an injured horse.
I shoot 'RAW' image files and develop in
Adobe Lightroom. I have shot a little bit of wildlife video with the
100-300mm and my GF1 and it turned out very nice! I am sure that with
the current GH2 it would be even better.
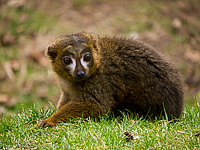
I captured these images 'hand held' at the
Edinburgh Zoo and the one of the
lemur was shot through fine wire mesh at ISO:200 at 300mm (600mm 'field
of view'). The baboon was taken indoors and through glass, he was
crouched on a shelf away in a dark corner and the image is an example of
an extreme 300mm (600mm 'field of view') shot at ISO:1600 with a very
slow shutter speed of 1/10sec. He was illusive and very difficult to
photograph, he seemed to understand that I was taking his picture and
moved away from the front of his room as soon as I raised the camera to
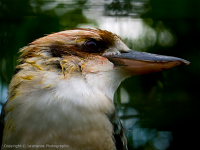
take the shot (smart monkey). The one of the bird was taken through
heavy wire fencing at ISO:400 at 136mm (272mm 'field of view').
More on the
Lumix 100-300mm and the
GF1+100-300mm Combo and some more
Zoo Images with the 100-300mm and
the Canon 300mm f2.8 IS L Lens. If you flip through the images the Lumix
100-300mm shots are in the last few sections.
As it currently
stands, if I could only have one camera and one lens from MY gear bag, I
would select my
Panasonic
GF1 Micro 4/3rds digital camera and
Lumix 20mm f1.7 Lens. The choice would be based on the size, weight and
the image quality I would get across a large spectrum of photographic
shots with the 40mm 'field of view'.
The choice is not made lightly, as I have a Canon 5D MK I with a Canon
50mm f1.4 USM lens and a Canon 450D DSLR with a Canon 24mm f1.4 L lens
which are both excellent combinations. The GF1 combination would provide
more 'flexible' photography, as it can be used in 'social' settings
where it is less likely to get in my road but also for more 'niche' work
and there is more -
The Panasonic GF1 combination is good for ISO:800 and that puts a fair
bit of power in your hands as the 20mm f1.7 (40mm FOV) lens can be 'hand
held' down at 1/10sec shutter speed in almost darkness and under street
lights any moving subjects at aperture f1.7 can usually be taken at
1/100sec shutter speed and frozen. Even better, the image quality with
the aperture 'wide one' at f1.7 is excellent for all manner of
shots and is capable of a very fine depth of field but also a reasonably
large depth of field. Check out the image samples for some f1.7 shots.
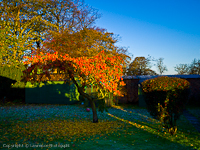
With uneven light
shots (bright skies/dark foregrounds) I invariably use a 2 stop
graduated grey filter to get the best dynamic range out of the combo
although the above shot of the garden tree was taken without a grad. To
achieve the best images you really have to shoot 'RAW' files and post
process them in SilkyPix (bundled with the camera) or Adobe Lightroom. I
have used both and they match each other with Lightroom having the edge
because of its software tools that can assist in post processing
corrections and to assist recover images that would normally be binned,
especially those treasured family moments.
This week, we had a ray of sunshine so I decided to visit the golden
waters, just of the Fife Coast under the famous Forth Rail Bridge
spanning the Forth Estuary at Queensferry in Scotland.
Teeming
with
all sorts of wonderful sea creatures it even hosts beautiful fish from
tropical waters in many splendid colours. What a place for scuba diving
in gorgeous warm waters, whilst armed with my trusty Panasonic GF1 Micro
4/3rds camera and Lumix 20mm f1.7 lens.
Now before you tourists come flocking to Queensferry with your scuba
gear, I'm afraid the good folks at the Deep Sea World in North
Queensferry, might not let you all swim in their fish tanks!
As well as large tanks, Deep Sea World has a huge underwater 'clear view'
glass tunnel where sharks and other large fish swim alongside you and
above your head. There is a fixed walkway and a slow moving flat
conveyor belt running alongside it.
I arrived at 10am just as the doors opened and walked in with a handful
of people. Within an hour all the kids in Scotland decided to visit the
place, along with their dads, mums, grand parents, wheel chairs, buggies
and even floating helium filled balloons. So much for a nice casual,
leisurely day taking pictures of fish, it was fight time at the tanks
for photographers, phone cameras, compacts, disposable 'film' cameras
and there was even a guy in a wheelchair, with a great big long lens up at
his face, rocketing about like a
Dalekin Dr Who.
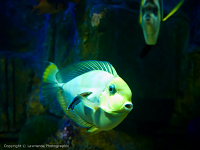
Anyway, I did manage to get some shots and I learned a great deal about
the GF1
and 'fish' photography. It is very difficult to capture a moving fish
and even more difficult (luck) to catch an interesting pose - check out
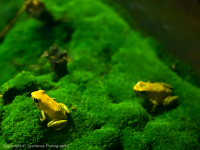
the little guy swimming alongside the big guy in the first image sample.
All the image samples were 'RAW' files, captured 'hand held'
and have had noise reduction applied in Adobe Lightroom. They have all
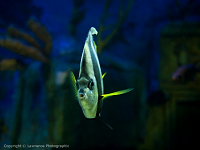
been cropped by about a quarter into the image. Other than the Angel Fish,
all the other images have had very little changes applied, saturation,
contrast and brightness.
The Angel Fish (image on the right) had smears all over the image from the disturbance in the
tank water and areas of tiny bubbles, it was spot removal, cleaned up as
best as possible and then using the 'adjustment' brush in Lightroom -
the background was reduced in clarity. I like the pose of the fish, so I
decided to keep the image.
ISO:I
tried real hard to keep the ISO rating down to ISO:400 but because I
required to raise the shutter speed up (on most occasions) to 1/60sec or
even better
1/125sec to have a half decent chance of
'freezing' fish movement, I was always in around ISO:800/1600 with an
aperture of f2. I could have used f1.7 on the 20mm lens, but at f2 the
image quality was slightly better and although the 'depth of field' in
focus was wafer thin, it was still larger than f1.7
and provided me with a nicer image.
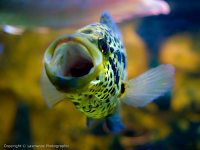
The fish on the left with it's mouth
wide open, is a good example of the wafer thin 'depth of field'. The 'spot' centre focus of the camera was positioned on it's left eye
and I used the smaller 'reduced' centre area focus.
The yellow frogs on the right also display a wafer thin focus and were captured at ISO:1600.
Exposure: I found that at f2, the camera metering often had my shutter
speed way down at 1/20sec, sometimes even slower and that was
at ISO:800, so I had to try and find a 'fine' balance
between image quality versus noise in the darker shadows by raising the
shutter speed up nearer 1/60sec to 1/125sec and under exposing the image.
Noise: The GF1 'RAW' files have tremendous latitude for post
processing away
the noise at ISO:800/1600 and it is a balancing act, between the size of
the final image for 'print' and just how much noise
reduction and sharpening to apply. It is a different application each
time I change the size of
the image, so what is presentable in a small print may well have to be
changed for
a larger print.
I invariably start by applying a little noise reduction
and sharpen it, then if need be, repeat the process with more noise
reduction until I reach a satisfactory image that 'hopefully' has not
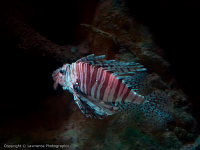
degraded down into a 'water colour' effect. The picture of the Zebra
Lion
Fish on the left is an example of an image taken at ISO:1600 and the
shutter speed raised in an attempt to freeze it. It is verging towards a water
colour effect so I let some of the noise creep back in to increase the
visibility of the fish. In fact virtually all my images at ISO:1600
(apart from the very well lit ones) have to display some noise in the
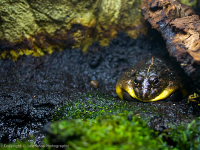
image to retain any quality in the subject. The large frog in the right image, was taken at
ISO:400 as it lay motionless in it's well lit tank, an ideal subject.
Glass + Water: Dammed difficult to shoot through at
the best of times, trying to avoid glass reflections and hoping that the
fish does not swim so fast and the water stays clear from tiny bubbles
and muck. Large streams of bubbles are great but others put small smears
on the image and spoil the effect. I invariably use aperture priority
mode, set the aperture to f2 and then balance the shutter speed as high
as I can get from an ISO rating as low as I can get. Ideally 1/125secs
at f2 at ISO:800 maximum but preferably ISO:400. I always use the AE
button and lock the final exposure setting. I usually have a good idea
of what the ISO/shutter settings should be at f2, so I invariably just
raise the camera to a brighter light to grab and lock a shutter speed
that suits me. Thereafter I put the lens against the glass, half press
and hold the shutter button to lock the spot (reduced centre area) focus
on the subject, re-align the scene if required and then press home the
shutter.
Conclusion: This type of photography takes the GF1 to it's
extreme limits, it is possible to get great images of moving fish in fish tanks
in a 'back lit' room but a lot of work is involved.
Not for me, not anymore, not with any camera, although
the
results with the GF1 can be pretty amazing.
No, after some months of trying HDR out, I dumped Photomatix HDR
software and concentrated on my B+W
Filters
for my GF1 Micro 4/3rds
camera.
I also use a kit of Lee Filters
for my 'full frame' Canon 5D
MK 1 DSLR camera.
HDR can open up the dynamic range of the image but a 2 'stop' graduated
grey filter delivers a more natural effect..............although HDR images can be very
dramatic, if they are not 'overcooked'.
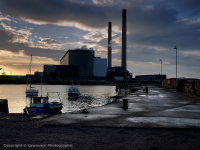
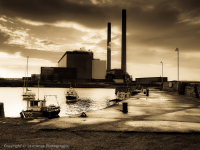
These images are an example of HDR extreme photography with the Panasonic
GF1. The first image on the right
was taken with the GF1 and the Lumix
20mm f1.7 lens and is a picture of the harbour at Cockenzie, East
Lothian, Scotland.
It was created using SilkyPix and a single 'RAW' file to generate 3 x jpeg files
of different 'pseudo' exposures which were then blended in Photomatix HDR software.
Not the ideal way to accomplish a typical HDR
picture. Usually I would take a minimum of 3 x different 'RAW' exposures
with the camera on a tripod and then blend them..................so I
cheated!
The original GF1 'RAW' image file was shot at ISO:100, aperture f8 and
shutter at 1/400sec. It was taken 'hand held' using the LCD to compose
it and the weather was appalling, it had just finished raining and the
light was starting to peek from behind the clouds.
These days, unless it
is a planned 'landscape' shoot with my Canon 5D DSLR, I rarely have a
tripod with me.
The GF1 files have tremendous latitude for post processing so I pushed
the boundary a bit by using the final HDR image and Adobe Lightroom to convert it to monochrome. The image on the left, is the
Lightroom conversion.
When it comes to post
processing software, I have tried SilkyPix which is bundled with the
Panasonic GF1 camera and also Adobe Lightroom which I now use for about
98% of my work.
Without a shadow of a doubt, SilkyPix delivers superior noise reduction
quality on a 'full size' low light image. When it comes to developing 'RAW' night and low
light files, SilkyPix is extremely capable and I prefer it, although I
still tend to use Lightroom due to my laziness. I cannot be bothered to
develop a whole load of 'RAW' files and jump over to SilkyPix just for
one or two low light shots.
SilkyPix has it's limitations for moving image files around and it is
not as flexible as Lightroom for post processing, although I believe the
upgrade to the professional version is worth considering as it is more
powerful than the bundled version.
I like Lightroom, it is fast to get to grips with and has good tools
like the adjustment brush. Sometimes my images appear excellent but on
closer examination can have
tiny flaws such as an object in the background that displays a blown
highlight, a candle overexposed or a light bulb in the dark. Provided it
is not too far 'blown' then Lightroom's adjustment brush can invariably
recover it and bring it's exposure down whereby it is properly visible
and in context with the overall scene.
There are images where some parts of the scene can never be recovered.
This next image is a classic example. SilkyPix actually did a better job
in relation to a full size version of the image but at 1,000 pixels,
Lightroom
matched it for colour and image quality and the difference in relation
to noise reduction is not so easy to spot at that size.
The Panasonic Lumix 14-45mm OIS Zoom Lens - Shutter 1/5th Sec -
This lens offers
excellent image quality and the image stabilisation is simply awesome!
I was out for lunch today with my mother and I had my Panasonic GF1
Micro 4/3rds camera and my Lumix 14-45mm Zoom lens with me - no external
viewfinder.
As we finished lunch, I wanted to see what the combination
could do in
low light and decided to take her picture with the restaurant bar in the
background. I used the LCD but I did not adjust and lock the exposure
which would have resolved the background problem but probably my
mother's face would have been darker. I don't use flash on the GF1.
Anyway, the LCD on playback showed the 'blinking' in the
background which were areas obviously blown out. It would have been much
nicer if there had been a little bit more detail in the signs and
lights, emerging out of the bokeh. Unfortunately the bar filled
up with bodies again so I did not get a chance to take another shot.
This 'RAW' image was captured at 45mm (90mm 'field of view') hand held at
ISO:400, f5.6 and the shutter speed was 1/5th sec which is a slow as it
probably gets for a hand held shot at 45mm..........quite incredible!
Not bad considering the photographer was in his 60s and the subject was
89 years old. You can see she is fed up - "hurry up, my backs killing
me" and I told her to smile as well.
The image was developed in Lightroom and converted to a jpeg and
re-sized for the web. I
have cropped it to a square size because there were 'blown' areas to the
left and right which were even more unsightly. The distance from my
mother to the bar was about twenty feet and for f5.6 the amount of 'out
of focus' is reasonable and so is the bokeh, considering the reflective
bright lights in the background.
Lightroom's adjustment brush could not repair the damaged signs and
bright light parts in the
background of the image which had nothing left to recover but it is a
nice example of the problem and the limitations of any post processing
software package. Of course it is up to the photographer to take the
picture correctly in the first place.
What
a year for torrential rain and this week
has
been horrendous. Scotland is a lovely country to visit, the mountain
views are spectacular, lush green landscapes and the Festival has just
started in Edinburgh. I hope the tourists have brought their umbrellas,
"rain madam, this is not rain, it is only a light mist, wait until you
see proper rain".................oh we hardy Scots!
First to do battle and usually with each other, no riots on the streets
here, we all drink Iron Bru "made from girders" so the advert states.
Whisky, nah, it's for wimps, most of us just use it as a mouthwash!
However, I do think the lads are softening up a bit. There is too much
of this "I like to cook" from this new generation of Scots.
Remember Henri Cartier-Bresson, time for a
'decisive moment' or you might end up like the guys in this video -
I
want to Break Free
The image was captured using a Panasonic GF1 Micro 4/3rds camera and a
Lumix 14-45mm zoom lens. It is a great combo for walking about and fits
very neatly, cupped in my right hand with a wrist strap for backup. With
a 'field of view' of 28mm to 90mm and image stabilisation, the lens
delivers very good image quality.
Ideally I want at least a 35mm or 50mm lens on a 'full frame' digital
sensor camera to have a reasonable amount of 'out of focus' control with
good quality
bokeh. The
lens image quality has to be excellent at the wider apertures (f1.4/f2)
to provide me with the ability to narrow down my 'depth of field' for effect. I enjoy this control with my Canon 5D MKI DSLR
and my 50mm and 100mm prime lenses.
When I pick up my more compact and lightweight system, my Micro 4/3rds camera, my Panasonic GF1 with it's Lumix
20mm '40mm field of view' f1.7
AF lens, I have to recognise the combos
limitations and benefits. With a
wide open aperture at f1.7, I know that the 'primary subject' which I
want to be in focus with a blurred background and which delivers
reasonable bokeh will have to be nearer to
my 20mm lens than with my Canon 50mm lens.
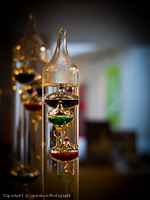
This image of the coloured glasses was captured
'hand held' at
ISO:200,
1/125sec and an aperture of f2. The glasses were inside a glass cabinet,
one behind the other on a glass shelf and I took the shot with the lens
against the glass front of the cabinet and the background was beyond the
glass at the back of the cabinet.
The Lumix 20mm lens benefits are
enormous - I can 'hand hold' it on my GF1 camera down at 1/10sec and
wide open at f1.7 - the image quality is simply amazing. The combo is
unobtrusive, lightweight and a blast to use with 'fast enough' autofocus
for pin point accuracy. On the street, indoors and for night photography
it is simply outstanding!
Although the Lumix lens
delivers a 40mm 'field of view' it still is a 20mm lens and even with a
Canon 'full frame' camera a 20mm lens is still darned hard to work with
for creating 'out of focus' 3D style shots, where the primary subject is
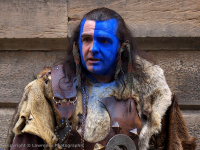
not distorted due to its closeness to the lens. The 'Early People' image
is a Lumix 20mm lens example of distance to subject with a reasonable
'out of focus effect' where the primary subject is not distorted.
This 'Early People' image was captured 'hand
held' at
ISO:400,
1/60sec and
an aperture of f2. The spot focus was on the face of the
front character from a few feet away, yet the background is out of focus
and this image has been well cropped. It would have been ideal, in 'some
instances' to have a 50mm lens with a 100mm field of view but
I am sure there would
have been difficulty in keeping the ISO down to 400 as the shutter speed
would have had to be raised to avoid hand shake with a 50mm lens on the
Micro 4/3rds sensor, not forgetting that I would have had to move
further back.
The Lumix
20mm is also terrific for f1.7 street shots where you want
excellent
image quality with a sizeable depth of field.
It has only one slight weakness with some night
shots, it can create a slight halo or coma effect above
street lights.
You can see an example of this in my GF1 camera diary article.
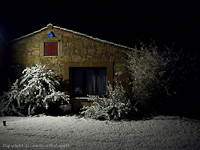
This night shot of the 'Peace and Rescue Centre' was taken
'hand held' at ISO:400, aperture f1.7 and shutter at 1/40th second.
There are a lot of lights but there was no coma in them.
All in all, the Lumix 20mm f1.7 lens is a 'stellar performer' and
probably the only other Lumix lens that I might consider to replace it
would be the Panasonic Lumix 25mm f1.4 DG Summilux ASPH autofocus lens, which
will soon be released. It
is early days and the 25mm lens professional reviews have yet to materialise.
These images and part of the commentary have been taken from my
GF1
Diary and
NMS articles.
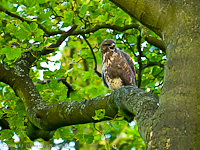
At my home at Hermiston,
I
finally managed to get a half decent shot of the young buzzard
in it's
'crèche' in the trees. It's mother leaves it there while she goes out
hunting in the fields for rabbits.
When it gets hungry, it makes a loud 'kee' cry over and over again until
the mother returns. I grabbed this picture as it was in mid cry. This
image on the left was captured at
600mm 'field of view', ISO:800 - shutter 1/125sec - aperture f5.6, not
perfect but not bad considering it was taken 'hand held' while I was
working in my yard and it was a
hurried shot. Its strange but as long as I was working the buzzard
ignored me but as soon as I stopped and raised the camera, it soon flew
away. I think it sensed the different body language and instinct kicked
in.
The
GF1 and the Lumix 100-300mm Zoom lens makes for pleasurable
photography even although the light was not that great under the trees
at 6.40am in the morning. Sure the image could be improved, if I set up a hide nearer
to the tree and waited with a flask of coffee, fixed up the tripod and
used my Canon 5D MKI DSLR with my Canon 300mm f2.8 IS L 'prime' lens to
take the picture but what a reasonable image I can get with the
GF1+100-300 zoom lens combo with no hassle.
The left jpeg image was converted from a 'RAW' file post processed in Adobe Lightroom.
The
image was cropped in by about 30%, producing a field of view of about
800mm, noise reduction was applied and then sharpening. At ISO:800 the
crop, noise reduction versus image quality is not bad and the full size
picture is good for a 12" x 9" print. If the shutter speed had been up
around 1/1250sec instead of 1/125sec the feather detail would have been
more pronounced.
Unfortunately
1/1250sec was not possible under the trees.
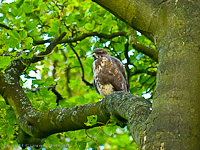
The second image on the right was taken at 600mm 'field of view',
ISO:1600 - shutter 1/250sec - aperture f5.6. Even at ISO:1600, with
30% cropping, noise reduction versus image quality, the picture is not that
bad, in fact it looks (to me) better than the one at ISO:800, so noise
reduction with a slower shutter speed of 1/125sec might not be as good
as noise reduction with a faster shutter speed of 1/250sec at ISO:1600?
I have been using my Panasonic GF1 micro 4/3rds camera for about
18 months now
and there is no doubt that to obtain the best images out of this
camera, I have to shoot ‘RAW’ files and post process them in Adobe
Lightroom Software on my personal computer.
Very often my images require the minimum in saturation, brightness
and contrast adjustment, whilst in other cases where the ISO rating
exceeds ISO:800 or I am using the Lumix 100-300mm OIS Zoom lens, I
will apply some noise reduction and sharpening. There is tremendous
latitude in the GF1 ‘RAW’ files for post processing without any reduction in
image quality or in overall image size for print purposes.
I always use a camera calibration
GF1 profile to set-up and create
my DEVELOPMENT pre-sets and thereafter it is just a simple matter of
choosing a pre-set that fits the type of scene and lighting
conditions, such as landscape, portrait, wildlife, street, contrast
and saturation amongst other settings, as well as colour or
monochrome.
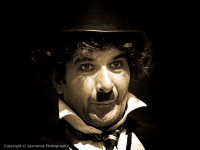
This image of
‘Charlie’ was originally colour and I used Lightroom to make the
monochrome conversion.
It was converted from colour to antique grayscale and in the EFFECTS
section the highlight priority was changed in the post crop
vignetting. The image was left sharp and slightly cropped for
effect. The shoulders, and the top of the hat were adjusted to
slightly lift and put back the exposure using the adjustment tool and the nose
and cheeks area were slightly reduced in exposure to remove the
glare.
There are so many different ways to present this image during post
processing and one day I prefer it in colour and the next
in monochrome. There are a multitude of different effects to suit
the individuals taste. You can compare the original sharpness of the
Lumix 100-300mm OIS Zoom lens in the monochrome image and the
softened effect applied to the face in the colour version (see
below).
Since I have started to use Lightroom, I have discarded my other
software packages even my HDR software. I am still tempted to
purchase Nik Silver Efex Pro for my colour to monochrome conversions
but so far Lightroom is handling this area very well.
I really enjoy using this lens with my Panasonic GF1 micro
4/3rds
digital camera. The combo is lightweight and very easy to carry
around all day in my right hand with a wrist strap for backup.
I find the balance with the GF1 is very good
and I always use the
Panasonic external 'clip on' viewfinder instead of the LCD screen.
The lens is exceptional for all kinds of photography and I have even
used it for portrait and street work.
This image
of the Charlie Chaplin (tramp) look alike
was taken in the High Street, the 'Royal Mile' of Edinburgh. The GF1 and
the Lumix 100-300mm zoom lens combo is excellent for distance shots in
the 'street' although the lens is not that discreet when fully extended.
The shot was taken 'hand held' and the 'RAW' image was post processed
in Adobe Lightroom. The lens is awesomely sharp and showed up all the
blemishes on the face. The
sharpness gave the image character but it was too much and spoilt the
look. I softened the face quite a bit and brought back the sharpness in
the eyes. In the background there is a dark pillar, so I added some vignetting to soften it away and
place more emphasise on the face. This
image was captured at
410mm 'field of view', ISO:200 - shutter 1/640sec - aperture f5.
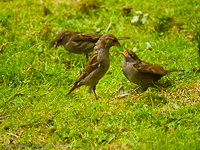
I post process my 'RAW' images using Adobe Lightroom software
and I usually have to apply some 'noise reduction' especially when using the
lens for shots at 300mm (600mm field of view).
This image of a baby sparrow screeching for it's mother to feed it, is an example
of extreme cropping in Lightroom.
The shot was taken in my back garden.
I did not expect to see the birds there and I was just about to
enter my house. It was a 'snapshot' and the camera shutter speed
should have been faster. The birds were in the wrong place
in the darker area of the garden and there was a wheel barrow
leaning against the wall protruding right into
a 1/3rd of the frame.
I was surprised that
the image still displayed good resolution despite noise reduction
and very heavy cropping. The image was taken 'hand held' at 600mm 'field of view'
- ISO:400 - shutter 1/250sec - aperture f5.6.
The mother bird seems unimpressed and you can see the blurring in the wings of the
baby as it screeches for food.
 haven
for wildlife and frogs love to settle in the long damp grass.
You would think that frogs like to hide in a pond but nope they
love the grass, under damp rocks at the side of water and even
garden dung heaps.
haven
for wildlife and frogs love to settle in the long damp grass.
You would think that frogs like to hide in a pond but nope they
love the grass, under damp rocks at the side of water and even
garden dung heaps. 
 it's
image quality vs distance limitations but the image is not half
bad for a lens that costs around £385.00 vat inclusive in the UK
(including the Panasonic £50 cash back). The lens 'field
of view' with the digital sensor 2x crop and the post processing
cropping in Lightroom 4.1 is probably about 800mm.
it's
image quality vs distance limitations but the image is not half
bad for a lens that costs around £385.00 vat inclusive in the UK
(including the Panasonic £50 cash back). The lens 'field
of view' with the digital sensor 2x crop and the post processing
cropping in Lightroom 4.1 is probably about 800mm.