|
I bought the
Panasonic GF1 digital camera back in November 2009 and in October 2010,
I decided to use it for a project that I had in mind. This involved
intensive 'indoor' photography but I wanted to keep the images natural
and I did not want to use the camera's built in flash or any other flash
device for that matter!
To see these
sample images in 1,000 pixels, click on a thumb image below and then
click on the 1,000 pixel image to return. To skip this article's text -
click
Conclusions to jump down this page.
During 2010, I had gradually removed all my 'add-on' devices from the GF1
camera.........the external viewfinder (which I had grown to dislike) my
graduated filter assembly and I was now using it 'lean and mean' with my Panasonic Lumix 20mm f1.7 Lens
and the combo slipped easily into a small Lowepro
60AW belt/shoulder bag. I had started to leave the Lumix 14-45mm OIS
Lens at home...............the zoom was terrific but I wanted to carry a
smaller set-up.
The combo seemed ideal for using at the National Museum of Scotland in
Chambers Street, Edinburgh. I reckoned that I could keep the ISO down to
400, as the lens would operate very nicely at f1.7 and f2 to capture the
indoor walkways and the exhibits. There were a lot of challenges ahead
as virtually all the exhibits were behind glass whilst others were quite
large in size.............I wondered how the 20mm lens would cope?
All the images would be captured 'hand held' without flash and I had decided that I would shoot the entire series in 'RAW' file format with
the jpeg conversion in Adobe Lightroom 3 Software. I was aware before I
started this project, that 'digital noise' on the GF1 image at ISO:400 would be
minimal. As it turned out, the noise level was still okay even with extensive cropping of
some of the files.
Museum glass cabinets are easy to scratch especially as I use a metal UV
'screw on
filter' on the front of my Lumix 20mm f1.7 Lens. I screwed onto the front
of the filter a rubber collapsible lens hood and left it in the folded
back (collapsed) position which served me well as a rubber cushion,
between the lens and the glass of the cabinets, which prevented
scratches. I took the time to
explain to the security guards that I was being careful of the glass
especially when they were watching my technique with some concern.
I snatched this image of the shop near the entrance to the museum, before
anyone could fill the scene.
 It
was taken at ISO:400, 1/100sec and an aperture of f2. I used a camera
GF1 profile in LR3 to get the colours that I like and I found that my
white balance of choice alternated between 'as shot' to 'auto' in LR3
and this applied to all my images. It
was taken at ISO:400, 1/100sec and an aperture of f2. I used a camera
GF1 profile in LR3 to get the colours that I like and I found that my
white balance of choice alternated between 'as shot' to 'auto' in LR3
and this applied to all my images.
The GF1 and 20mm Lens combo was an absolute treat to carry in my right
hand using the body ridge to hold it and with a small wrist strap for
extra protection, lest I drop it. It was set-up as a small 'rangefinder'
and I used the
shutter
button to half press it to autofocus on the part of the scene that I
want in focus (using the Spot - 1 Area AF) and by still holding the half
press, I can re-arrange my scene in the LCD/Viewfinder and then fully
press down the button to take the shot. This is ideal for 'isolating the
focus' of subjects in an overall scene.
How I use the GF1 is fully covered in my
Article on Downsizing.
The GF1 and 20mm Lens combo is excellent for a large 'depth of field'
but also a paper thin 'depth of field' for certain subjects
when using apertures
f1.7 and f2.
 I
love the way that you can switch and control the depth of field, the
front subject in focus
and the background out of focus or the other way
around if you so wish. I
love the way that you can switch and control the depth of field, the
front subject in focus
and the background out of focus or the other way
around if you so wish.
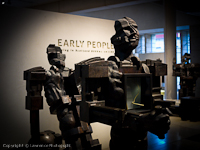
This first 'Early People' image was captured at
ISO:400,
1/60sec and an aperture of f2. The spot focus was on the face of the
front character from a few feet away, yet the background is out of focus
and this image has been well cropped. It would have been ideal, in 'some
instances' to have a 50mm lens with a 100mm field of view but
I am sure there would
have been difficulty in keeping the ISO down to 400 as the shutter speed
would have had to be raised to avoid hand shake with a 50mm lens
on the Micro 4/3rds
sensor, not forgetting that I would have had to move further back.
The second 'Early People' image
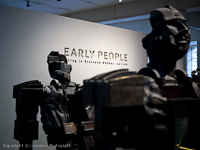 was
captured at
ISO:400,
1/60sec and an aperture of f1.7. The spot focus was on the wall with the
writing and this time the face of the front subject was the part that
was out of focus.
Once again the image was cropped and the image quality has held good
with very little noise. The first image is slightly warmer than the
second but I am not sure which white balance I prefer? was
captured at
ISO:400,
1/60sec and an aperture of f1.7. The spot focus was on the wall with the
writing and this time the face of the front subject was the part that
was out of focus.
Once again the image was cropped and the image quality has held good
with very little noise. The first image is slightly warmer than the
second but I am not sure which white balance I prefer?
It is amazing that this little 20mm lens can produce 'out of focus shots' at greater distances than you would think possible
at that focal range.
 The
wide apertures, especially f2 which produces exceptional image quality, have a lot
to do with it. The
wide apertures, especially f2 which produces exceptional image quality, have a lot
to do with it.
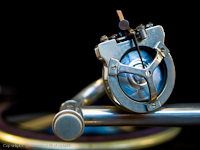
This shot is the head of an old gramophone and it is tilted back from
the record on the deck. It was inside a glass case set back from the
front glass. I placed the lens flat against the front of the glass and
focused the 'spot focus' on the front of the head, I pressed the AE
button to lock my exposure, then holding the
shutter button half shut to lock the focus on the head, I gently slid the lens across
the glass to
the left and then took the shot at
ISO:200,
1/40sec and an aperture of f1.7.
 The
depth of field at this range is very thin and this image was also
cropped to bring the head of the gramophone nearer to the front. The
depth of field at this range is very thin and this image was also
cropped to bring the head of the gramophone nearer to the front.
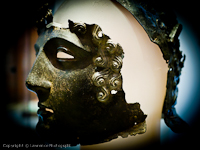
The image of the helmet mask was taken very much the same way. It
was captured at
ISO:400,
1/10sec and an aperture of f2. Again the depth of field was thin and
again the shot was cropped for effect.
 I have added in some vignetting in LR3 for effect, it is to some peoples
liking and I think it draws the eye more to the subject and does lend
a different mood to the shot. I have added in some vignetting in LR3 for effect, it is to some peoples
liking and I think it draws the eye more to the subject and does lend
a different mood to the shot.
This image of the coloured glasses is a good
example and I captured it at
ISO:200,
1/125sec and an aperture of f2. The glasses were inside a glass cabinet,
one behind the other on a glass shelf and I took the shot with the lens
against the glass front of the cabinet and the background was beyond the
glass at the back of the cabinet.
This image of a mask with the text at the back was taken through a glass
fronted cabinet and as the mask was distant the image was cropped to
bring it forward to the left and yet retaining the text background which
is out of focus.
I captured it at
ISO:400,
1/13sec and an aperture of f2.
I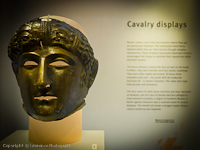 have never tried it, but I guess a tripod could be used for those glass
cabinet shots, especially for timed captures and in particular for
using a 50mm lens to reach into the image...........although it is one
thing to casually capture an image 'hand held' without inconveniencing
others...........a tripod might draw some frowns?
have never tried it, but I guess a tripod could be used for those glass
cabinet shots, especially for timed captures and in particular for
using a 50mm lens to reach into the image...........although it is one
thing to casually capture an image 'hand held' without inconveniencing
others...........a tripod might draw some frowns?
This picture of the outside of a loom was taken at
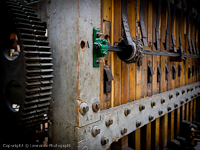 ISO:400,
1/125sec and an aperture of f2. I like the gradual fade out of the focus
and the quality of the image is remarkable at those settings. The centre
'spot' focus was on the edge near to the wheel at the front and then the
scene was re-adjusted to suit. It is a real 'blast' using the GF1 and
the Lumix 20mm f1.7 Lens for this type of photography. Nobody pays
any notice of you and because the camera is small you can easily
hold it in places that would prove awkward for larger DSLR kit. ISO:400,
1/125sec and an aperture of f2. I like the gradual fade out of the focus
and the quality of the image is remarkable at those settings. The centre
'spot' focus was on the edge near to the wheel at the front and then the
scene was re-adjusted to suit. It is a real 'blast' using the GF1 and
the Lumix 20mm f1.7 Lens for this type of photography. Nobody pays
any notice of you and because the camera is small you can easily
hold it in places that would prove awkward for larger DSLR kit.
You can see a red
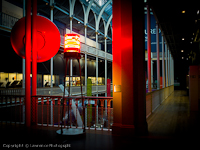 light
in this next shot which was taken at ISO:400, 1/60sec and an aperture of
f4. This image shows a reasonable depth of field which is pleasing to
the eye and quite broad, considering the focus was on the red column. I did
use AE (exposure lock) on a great number of my shots in the museum and
this image is an example of my trying to balance the 'very bright' red
light in the near centre of the picture against the rest of the scene.
Again vignetting was added in LR3 to change the mood of the image. light
in this next shot which was taken at ISO:400, 1/60sec and an aperture of
f4. This image shows a reasonable depth of field which is pleasing to
the eye and quite broad, considering the focus was on the red column. I did
use AE (exposure lock) on a great number of my shots in the museum and
this image is an example of my trying to balance the 'very bright' red
light in the near centre of the picture against the rest of the scene.
Again vignetting was added in LR3 to change the mood of the image.
I have started to take pictures of the hallways
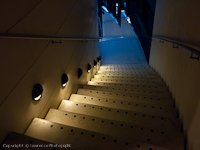 and
floors of the building and this stair shot was taken at ISO:400, 1/30sec
and an aperture of f4. The change in lighting combined with the texture
and layout of the stairs makes for a different kind of image. At f4
there is a very decent 'depth of field' and the camera is at it's best
at that aperture although the ISO rating at 400 does take out some of
the image quality.
The texture of the walls and the stairs are very unusual and should not
be confused as excessive noise in the image. and
floors of the building and this stair shot was taken at ISO:400, 1/30sec
and an aperture of f4. The change in lighting combined with the texture
and layout of the stairs makes for a different kind of image. At f4
there is a very decent 'depth of field' and the camera is at it's best
at that aperture although the ISO rating at 400 does take out some of
the image quality.
The texture of the walls and the stairs are very unusual and should not
be confused as excessive noise in the image.
This next one is of a very well lit corridor area, the colours and reflections on
the floor make an
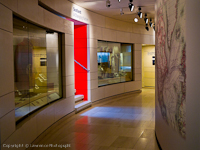 interesting
contrast, especially the red wall section. It was captured at ISO:400,
1/80sec and an aperture of f2. The depth of field is deep and the image
quality is excellent for the aperture used. I could easily have dropped
the ISO to 200 for this picture but during that rare occasion when there
was no-one in the scene, I snapped the shot and milliseconds later the
corridor had filled up again. I may well return to the museum to
concentrate on taking 'people' images! interesting
contrast, especially the red wall section. It was captured at ISO:400,
1/80sec and an aperture of f2. The depth of field is deep and the image
quality is excellent for the aperture used. I could easily have dropped
the ISO to 200 for this picture but during that rare occasion when there
was no-one in the scene, I snapped the shot and milliseconds later the
corridor had filled up again. I may well return to the museum to
concentrate on taking 'people' images!
I have never figured out how they manage to get a train up onto a high
floor. Do they take it apart, does the museum roof open up but even if
it does, how do they get it onto a middle floor? Perhaps the building comes
to pieces like a 'Meccano Set' and
they crane it in?
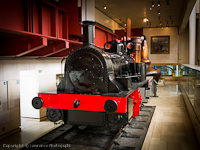 In
any case it is quite impressive and the train looked great in it's red
and black livery! I captured this shot at ISO:200, 1/25sec and an
aperture of f4. The depth of field was great and the picture on the
back wall has very reasonable image quality. In
any case it is quite impressive and the train looked great in it's red
and black livery! I captured this shot at ISO:200, 1/25sec and an
aperture of f4. The depth of field was great and the picture on the
back wall has very reasonable image quality.
This next image of the cabinets and the plinth was taken with the 'spot' focus on the stone plinth on
the
 right
side. The aperture setting ensured that the background was out of focus.
It was taken at ISO:400, 1/50sec and an aperture of f1.7. right
side. The aperture setting ensured that the background was out of focus.
It was taken at ISO:400, 1/50sec and an aperture of f1.7.
The 20mm lens delivers a reasonable bokeh, quite surprising for a 20mm
focal range and even with the 2x crop of the GF1's sensor which produces
a 40mm field of view, the image retains decent quality and out of focus
effect!
This last image is a shot of a floor area of the
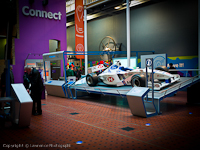 museum
and it was captured at ISO:200, 1/15sec and an aperture of f2. I added
some vignetting to raise some atmosphere to the picture and to reduce
the focus area more to the man and the racing car. museum
and it was captured at ISO:200, 1/15sec and an aperture of f2. I added
some vignetting to raise some atmosphere to the picture and to reduce
the focus area more to the man and the racing car.
This car was the first that Scotland's Jackie Stewart (F1 World Racing
Driver) had radically re-designed to place the metalwork and the
radiators away from the front to create the first 'safety pod' shell to
protect the driver's feet in the event of a front end crash.
More images in Mpeg-4 video format -
NMS Video
Conclusions
I found the combo very small and light to carry around, very discreet
and the LCD was a treat to use as I did not require the external
viewfinder for those indoor shots.
All my images were captured in 'RAW' file format and post
processed in Adobe Lightroom 3 Software. I used a GF1 camera profile to
get the colours that I like.
All the shots were captured 'hand held' without flash and the glass cabinet images
were taken with the camera lens 'front' resting flat on the glass to
prevent back reflections from the glass entering the lens. I use a UV filter on the front of
my lens but for the 'glass resting' shots, I put on a screw rubber
collapsible hood (in the folded back position) and the rubber prevented
any scratches occurring.
The Lumix 20mm lens with it's 40mm field of view on the GF1 is a good
range to work with as it covered the majority of my desired images
although the glass cabinet shots could have done with a 35mm lens with a
70mm field of view on the GF1 2x crop sensor as I had to 'crop' a great
number of my images later in post processing to achieve the same effect.
I could have used ISO:800 or even up to ISO:1600 but I wanted the best
image quality that I could get from indoor shots and I was very
surprised at how many keepers I had from images captured 'hand held' at
very low shutter speeds.
My GF1 was used at ISO:200 or ISO:400 in aperture priority mode with
apertures from f1.7 to f4. The exposure meter was set
for 'multiple metering' without any - or + exposure adjustment and I
used the AE (exposure lock) button to set/lock my exposure. I
tend not to use the - or + exposure compensation as I just point at a
light source that I feel suits the overall scene then press the AE
button. As the AE is an off/on toggle, I can very quickly compose the
exposure of a
scene to suit my requirements. Using the AE like this is a 'lazy'
approach but I sometimes use the exposure compensation wheel on the back
of the camera and then press the AE button to lock the adjustment. The
GF1 autofocus was set for single area 'spot' focusing on a given subject
- locked by a half shutter button press and the scene re-adjusted for the full
shutter button press to take the shot.
Overall, I found that the GF1 and the Lumix 20mm f1.7 Lens combo served
me very well. The noise at ISO:400 was well contained and I did not have
to make any 'noise reduction' in post
processing with Lightroom.
For the full
web gallery of my National Museum of Scotland Series -
NMS Gallery
More images in Mpeg-4 video format -
NMS Video
If you have enjoyed this article - please donate to my
Charity of Choice -
The Sick Kids
Richard Lawrence
Scotland
United Kingdom
Back to Articles Page |